


Page speed has gained so much importance as a key factor and we can’t stress enough what an incredible metrics it is to determine the overall digital marketing strategy and the online presence. It has a major impact on the SEO rankings and the digital marketing strategy. So what is page speed? Simply put, it is the speed at which your webpage loads. With an increase in the internet traffic through smaller devices and viewers visiting your site on the go, it is important that you not only optimise your design to suit all screen types, but must also provide an infrastructure that will help the design to load fast.
The goal of this blog is to explain how we achieved a difference in performance of our website by taking certain steps that helped to increase the page speed and improve the overall user experience.
To begin with, we first checked the current speed of our web pages by using an online speed test tool for websites.
The starting point – Webpagetest report
We generated a report with an online tool called Webpagetest tool to see the current performance of our website. This step will help you to determine which areas we need to target, which areas can generate the most results and hence would be worth spending time on, etc. and will also serve as a benchmark to compare the performance post the improvisation. See the report below.
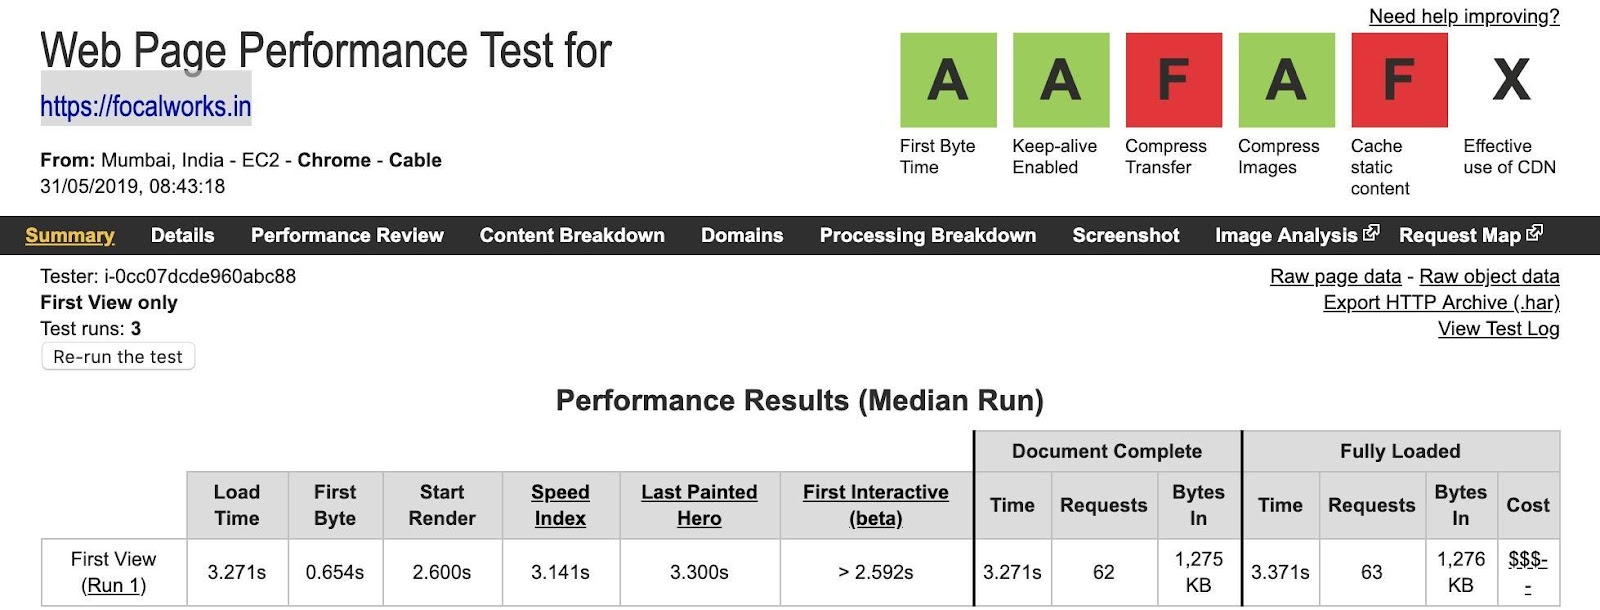
Image: Site’s performance record on webpagetest before any modifications were made.
How to use the Webpagetest site
To run a page speed test using this site, you will need to provide:
- A URL
- A location
- A preferred browser
Before you choose a location, it is important to know which geo locations give you the maximum traffic. You can do this check with the help of Google Analytics. Google Analytics can also be used to determine the most popular browser on which your site is being viewed and so you can start targeting them first. In our example report above, you can see that the location is ‘Mumbai’, the preferred browser is ‘Chrome’ and the URL is our company URL which is ‘https://focalworks.in’.
What next? The 2 important things to do.
Based on the report, we decided to focus primarily on two tasks. Both these improvements are basic configurations on the server (Apache or Nginx). Typically, it just took us about an hour to get it done. These were:
- Compress the files which are being transferred using GZip (Wiki URL: GZip)
- Cache the static content of the site and leverage the browser cache
Now, in the report, you will see ‘First Byte’ time. This column shows the number of requests that can be improved. In our example, we will need to make some infrastructural changes, introduce some kind of caching mechanism like Varnish, Redis or Memcached, to improve the First Byte time. But, many times, these small tweaks can result in a huge factor and that’s what we wanted to do.
Step 1: Enabling GZip compression on Nginx
This is the first task we did. We enabled GZip on the serverby just tweaking a few lines on the nginx config file. Typically, inside a linux Ubuntu installation, you can find the nginx.conf file inside the /etc/nginx folder. Here’s what was needed to compress the Gzip files:
- Checked that “gzip on;” is uncommented to ensure that we have enabled GZip on our server.
- Checked if the line“gzip_min_length 256;” is present. If it wasn’t present then we would have needed to add it. This line tells Nginx to only gzip files which are more than 256 bytes. This can be tweaked as per requirement. But the basic idea is that we don’t want our server to gzip every file which is requested because any file below this threshold is anyways not going to make any difference in the reduction of file size. On the contrary, it will increase the server’s CPU usage on compressing these smaller assets.
- Checked that “gzip_types” have some of the common file types. For example, “text/plain”, “text/css”, javascript files, icons and a few other things (the final one which we added was “gzip_types text/plain text/css application/json application/x-javascript text/xml application/xml application/xml+rss text/javascript application/vnd.ms-fontobject application/x-font-ttf font/opentype image/svg+xml image/x-icon;)”
Then we just had to restart the Nginx server, open the Chrome browser and check whether the changes that were done reflected on the headers or not.
The Before and the After
So, as per our previous report, all our Javascript files “.js” were not being GZipped. We had 4 JS files loading on our home page including the jQuery and jQuery UI library file and Google Analytics. Here’s a screenshot of headers for one of the Javascript files:
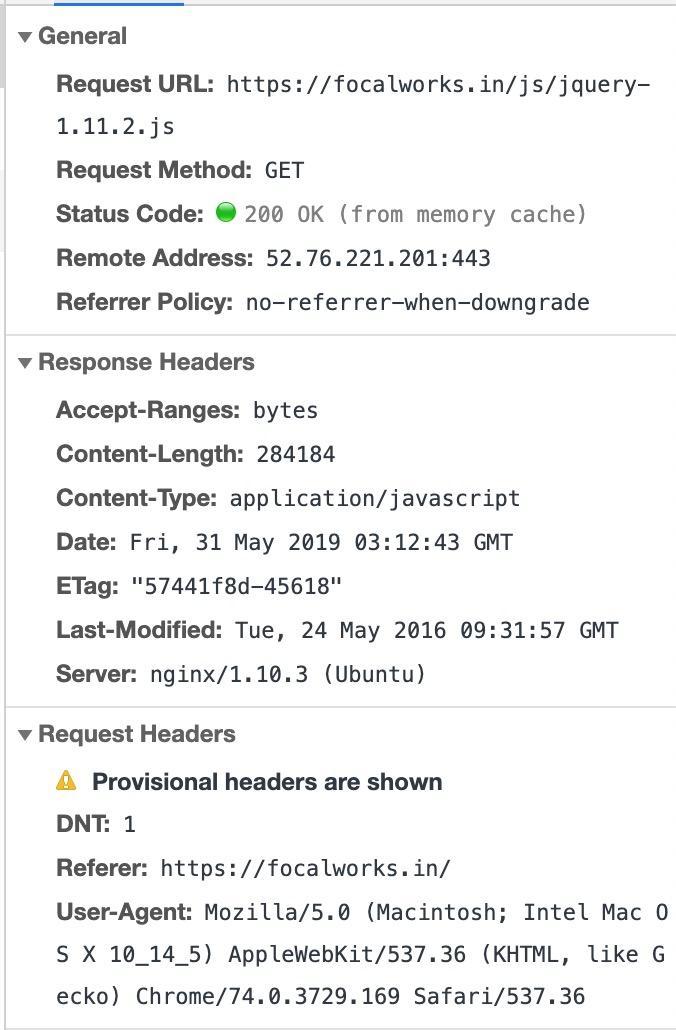
Image: Content type is application/javascript and no encoding header is present.
After making the configuration changes and restarting the server, when we saw the headers again, we could see that ‘Content-Encoding: gzip’ is present. Basically, this means that the Javascript file which is sent from the server is first gzipped by our nginx server. Chrome will get that request as a gzip file and will detect that. Although the encoding is gzip, the ‘Content-Type’ for the file is ‘application/javascript’. So, it will deflate that file and treat it as a js file. Below is a screenshot of the headers of the same file after gzip is enabled:
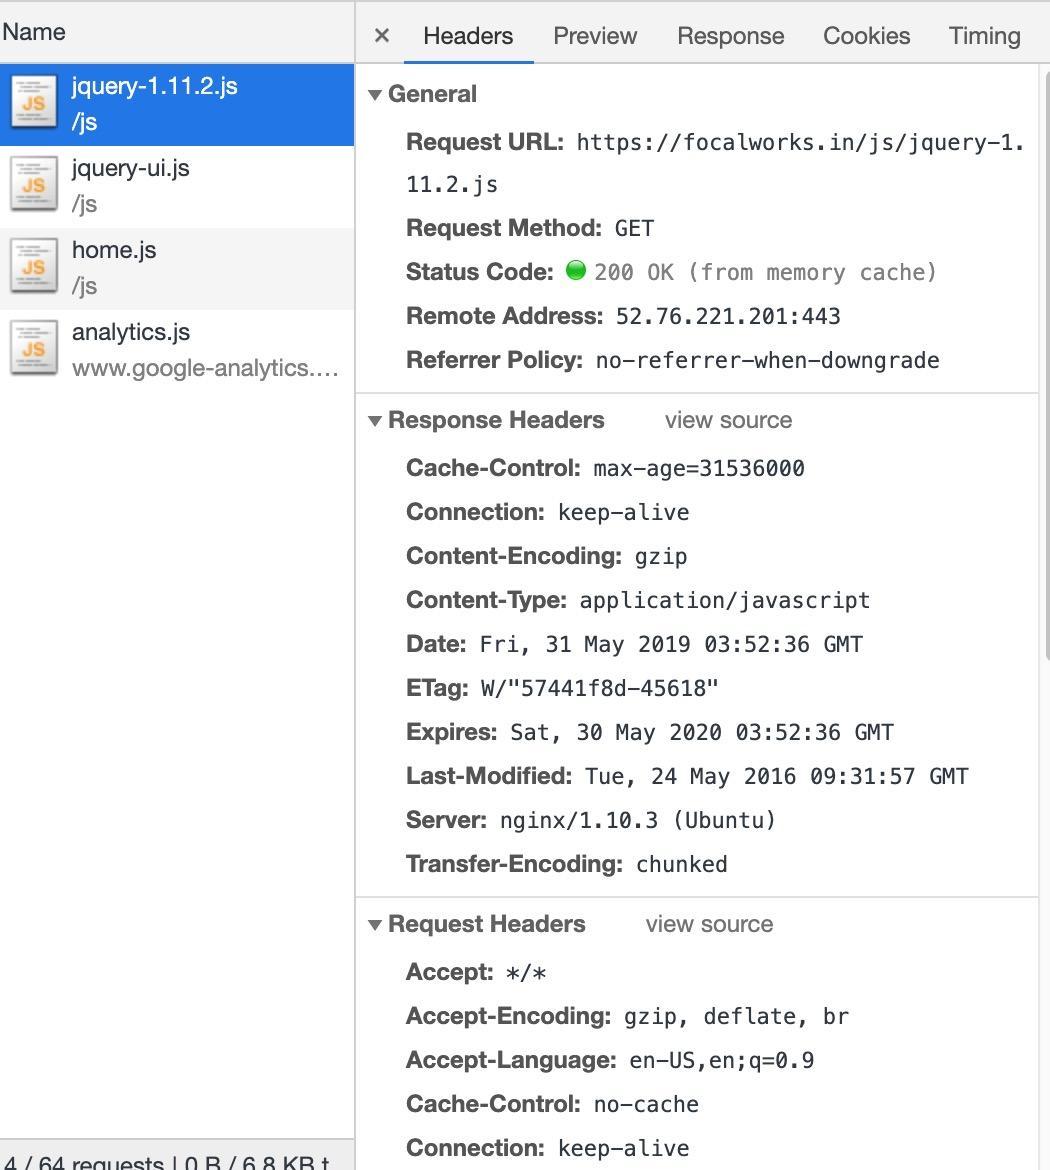
Image: Content type is application/javascript and no encoding header is present.
This showed that our first improvisation was successful and so we moved on to the next improvement which was to leverage browser caching.
Step 2: Caching static content and leveraging browser caching
For every website, there are quite a few assets which are common across many pages. In our case, quite a few CSS, JS are common, which means that once the user visits any page from our site, in the subsequent pages, the assets should not be downloaded because they are already present in the browser cache. But, for this to happen properly, we need to add an expiry header to every asset.
In the screenshot below, you can see that there were no expiry headers provided for the images. The same was true for CSS and JS files. This meant that the browser will request for the file from the server every time and download it on every page.
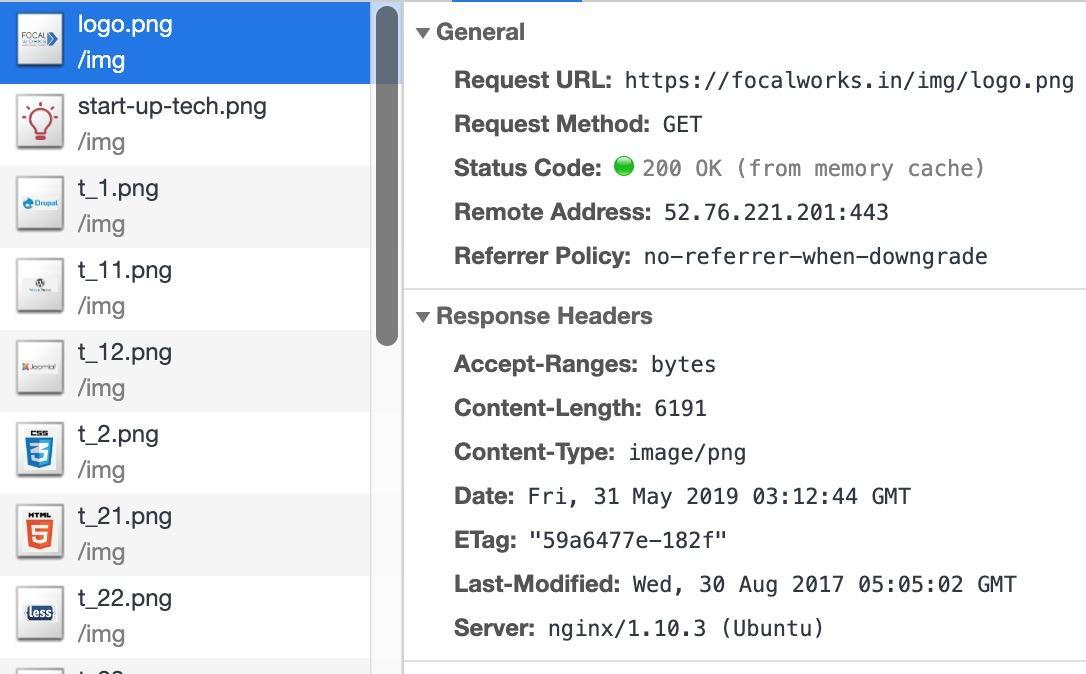
Image: The response headers for images without any expiry headers.
We had to correct this. The only thing needed was to add a block of nginx configuration which contains the domain mapping information. This nginx configuration will tell nginx that any asset with those extensions will expire after a year.
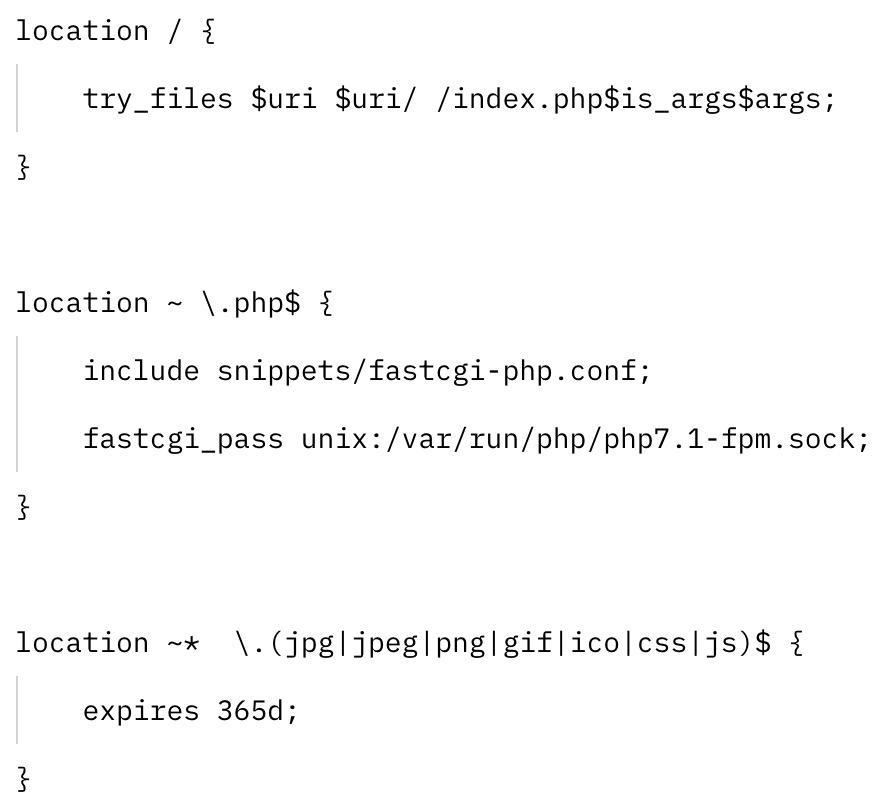
Image: Nginx configuration to add an expiry header of 1 year to any file type which will match the extensions mentioned.
Once this was added and the nginx service was added, we could see the expiry headers, which in turn means that the browser cache will start working. You can see this fix in the below screenshot.
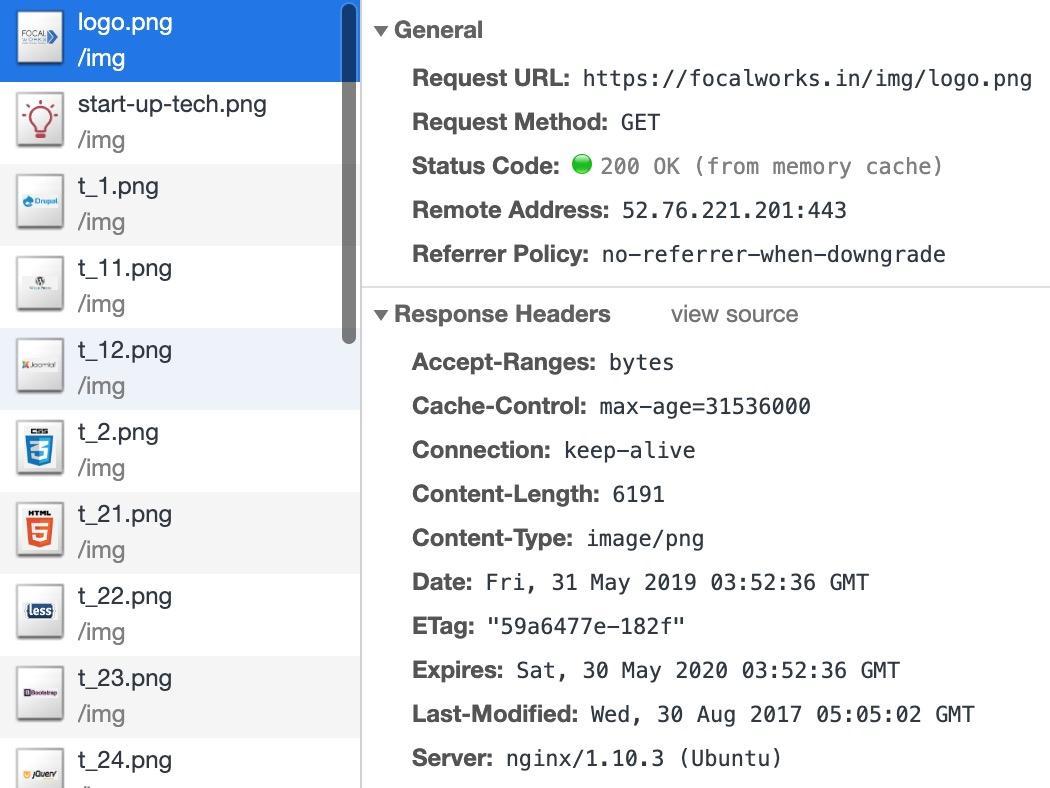
Image: The Expires header allows us to leverage the browser cache.
The result
Once these changes were made, we ran the tests again. The difference in the output was clear and the improved ratings also proved the point.

Image: The results show that we are now compressing the transfers and caching the
static content as well.
To make it a bit simpler, let’s take a look at some actual numbers to understand what difference we were able to make to the page speed post improvisation. See the reports below.
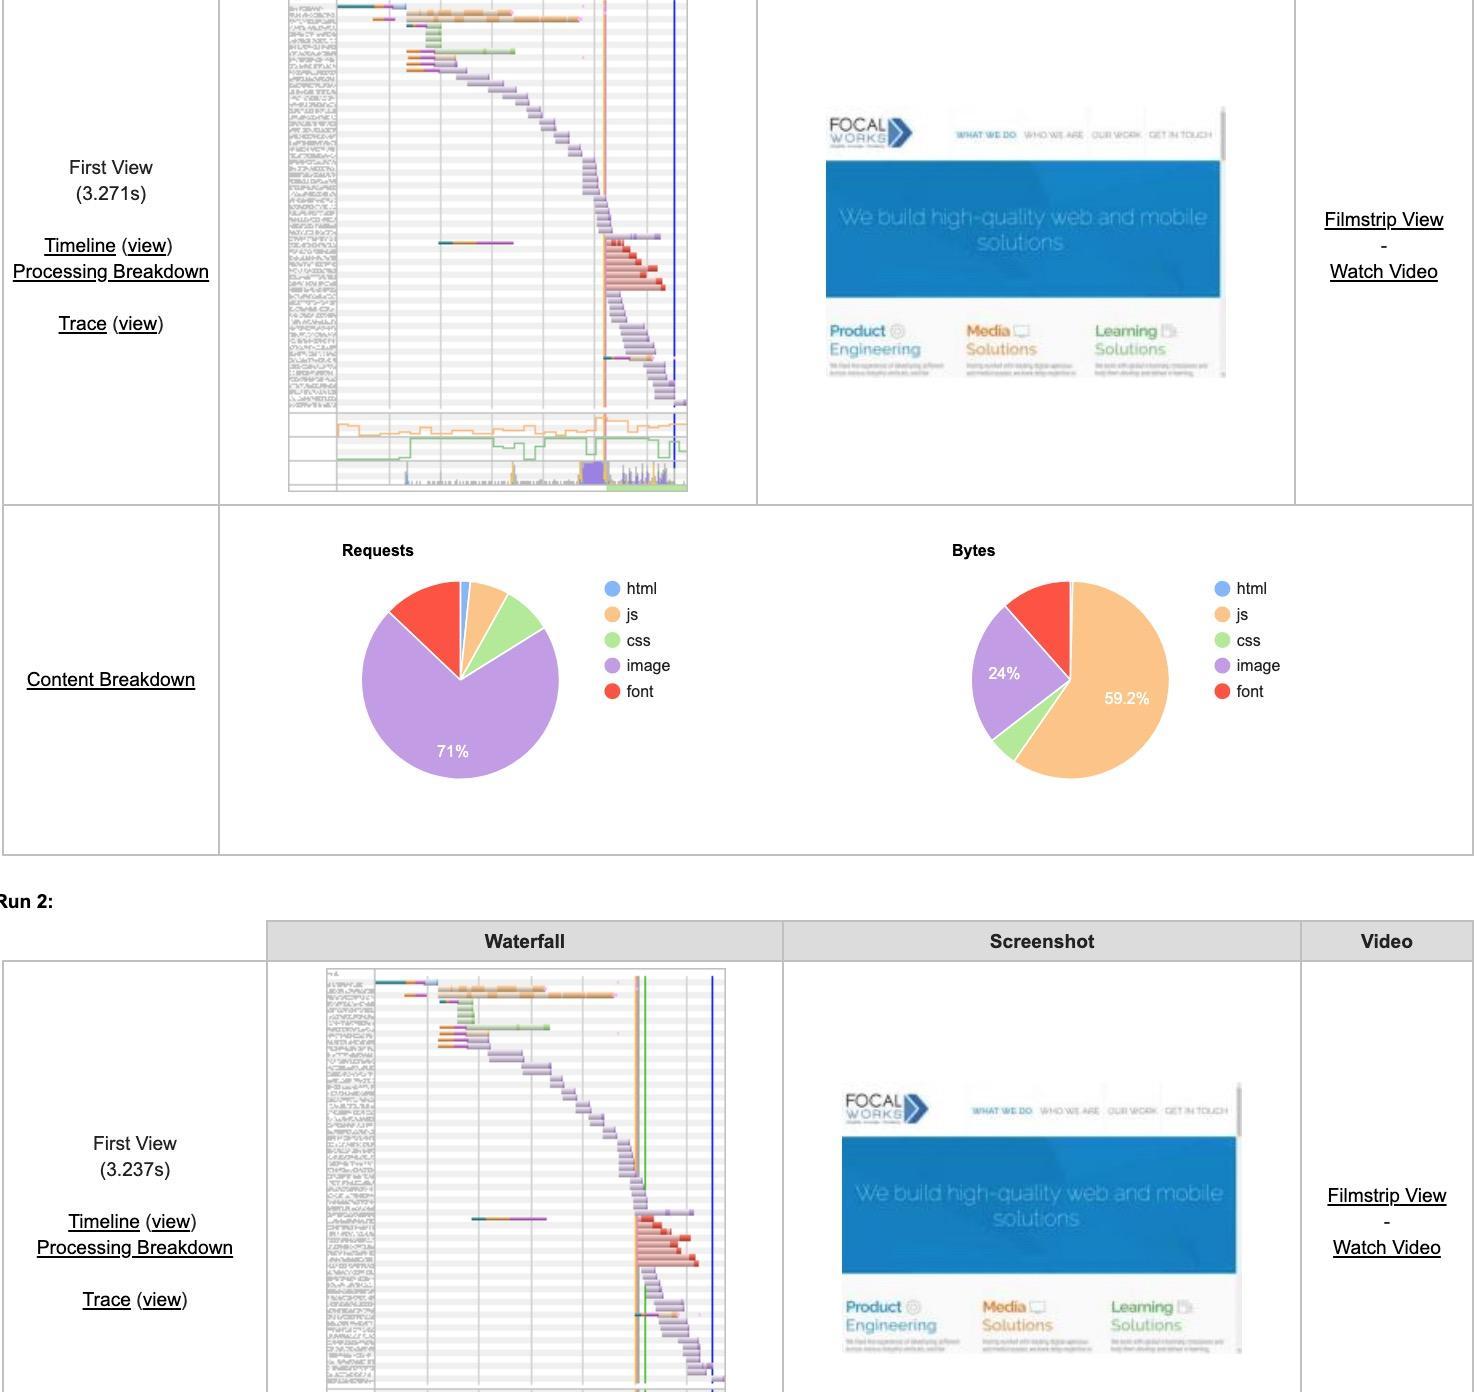
Image: The first and the second views are before the improvements.
Initially, the first view was about 3.271 seconds and the second one was 3.237 seconds, which is really not a big difference. Now let’s look at the new results.
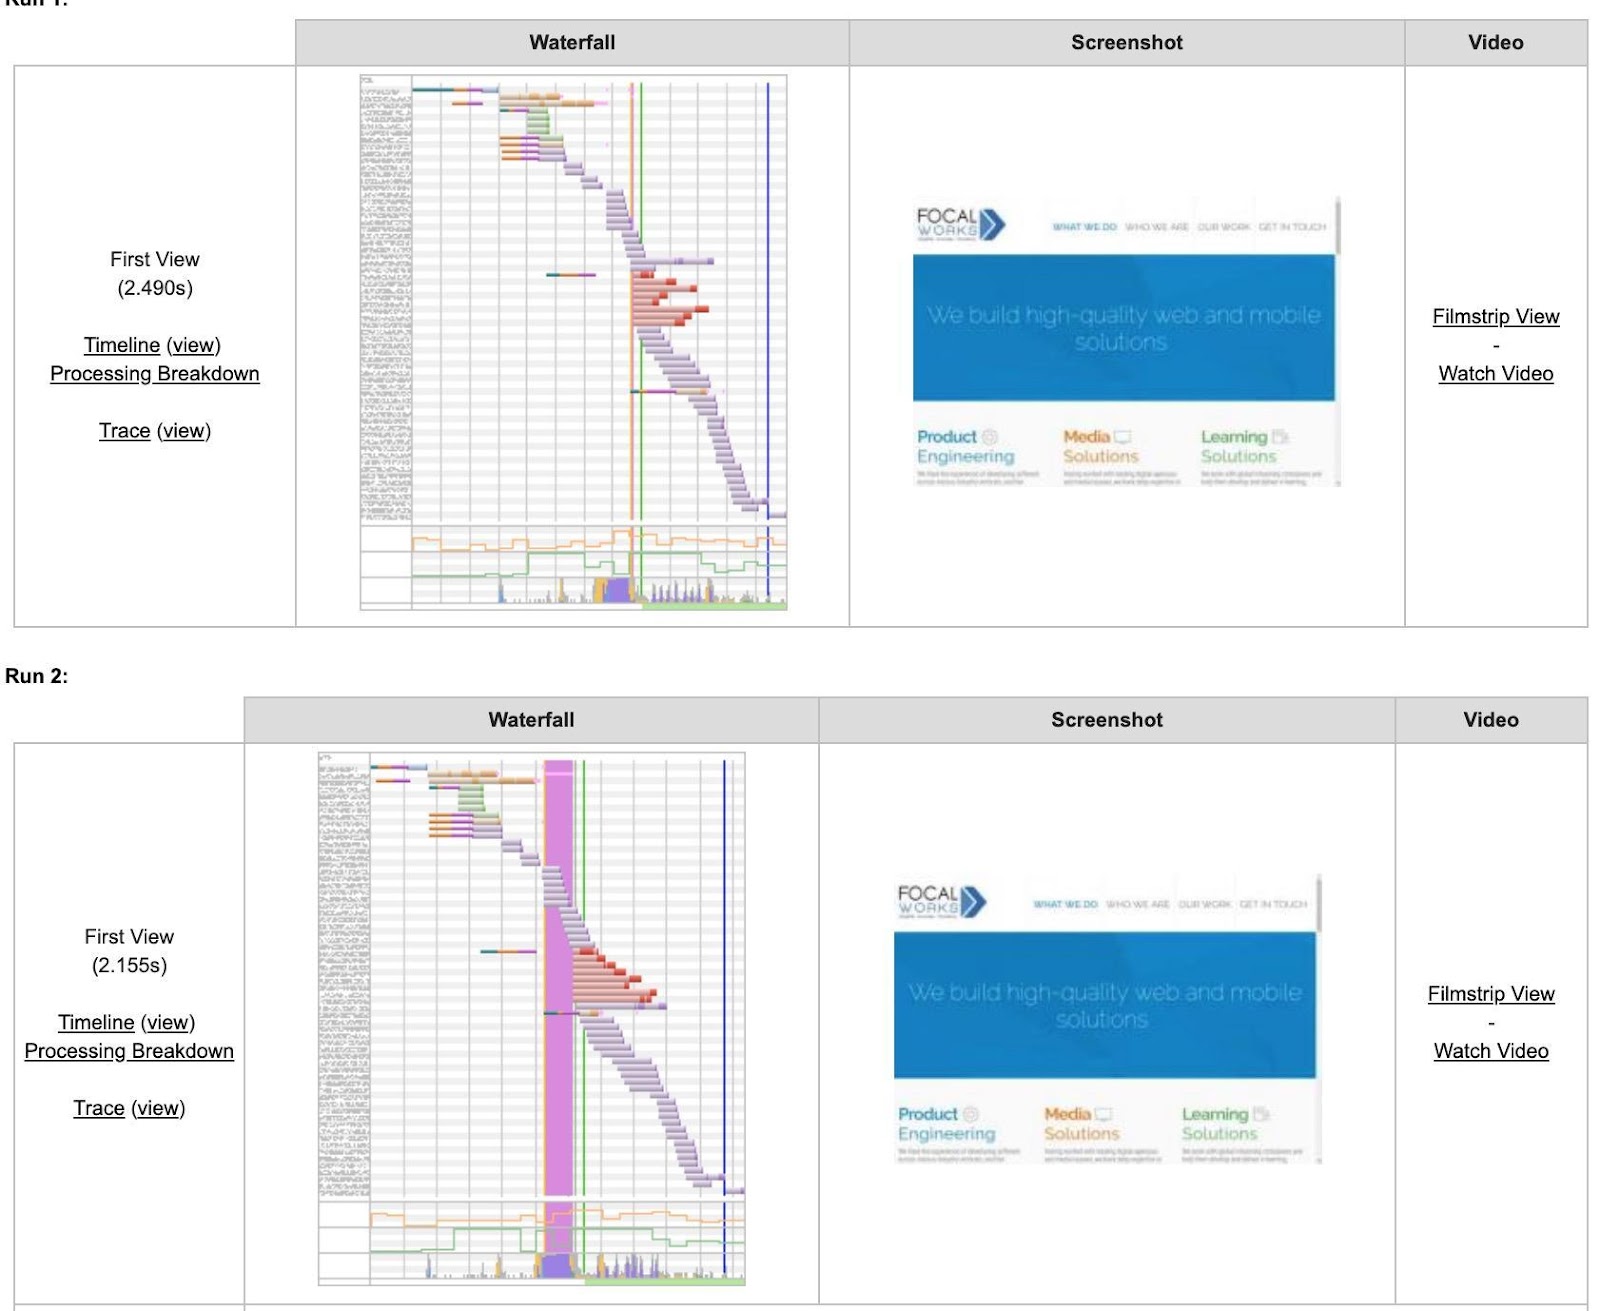
Image: The first and the second views are after the improvements.
In the new report, we can see that the first view came down from 3.271 to 2.490 seconds which is like 0.7 seconds less or we can say about little more than 23%. But the more important thing is the second view which has improved by a good margin from the previous test and we can see a good difference of more than 1.08 seconds (about 33%).
In conclusion
There are a few more things which we can improve on to make the site faster such as reducing the number of requests by having sprite images instead of individual images for the logos, minifying the javascript files into one, etc. Even using CDN for the assets is something to action on. These improvements will also enhance the user’s browsing experience on your site. It will help you to keep them hooked on your website and click on that one action button which may be to fill out an enquiry form, buy a product, subscribe to your newsletter, or whatever is the most important action to do on your website.
Have you ever had to take these steps in any situation? Let us know your experience down below in the comments.